


 Reply With Quote
Looks like you are doing great work there Errol but why do you want to fix up so many of these?

 Fair Contributor to the Forums
 Last Online: 26-06-2024 @ 11:46 AM


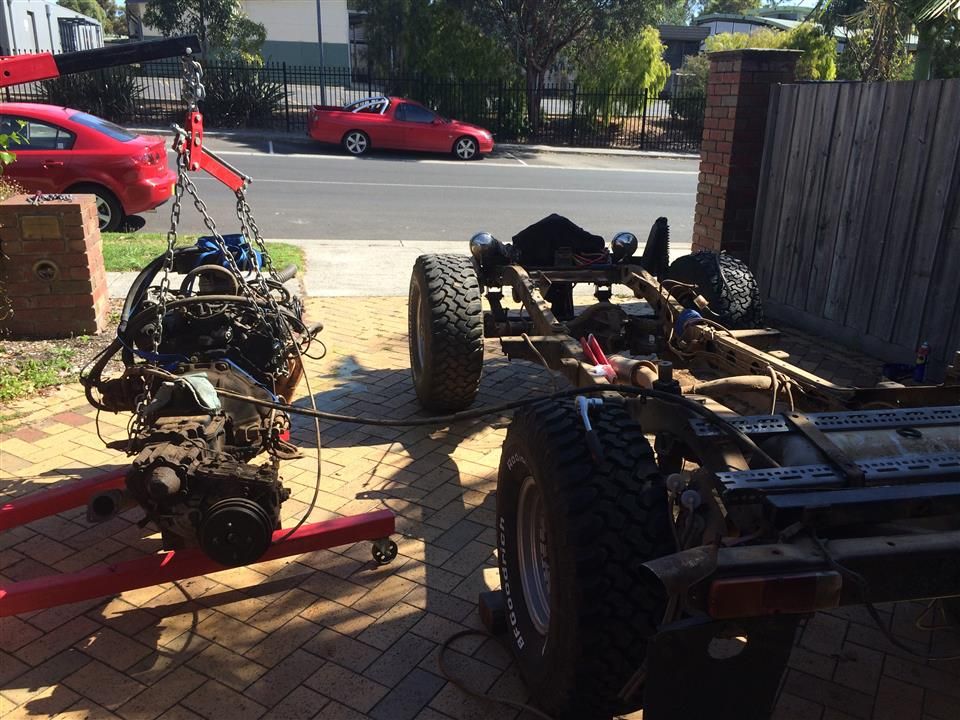
So the next stage was to get ready for the power steering conversion (more on this later). But part of that preparation work was to swap over the pitman arms, once we started we found some of the bearings and seals were pretty warn, so we decided to completely rebuild the front/rear axles with all new bearings/seals. You can see the front axles being rebuilt...
It was now time to swap in the 5 speed H55F gearbox from a FJ60. This is a pretty involved swap, as the gearbox is physically longer and needs new gearbox mounts, new tailshafts and(later) will need the floor pan cut to accommodate the new shifter location. On the 4 speed gearbox there is a handbrake drum mounted to the output shaft, however as these gearboxes have a tendency to leak oil into the drum the handbrake never really worked. When Toyota standard building the FJ60 they went with a 5 speed gearbox and a traditional rear handbrake setup. This means when swapping a H55F into a FJ40 you need to relocate the handbrake, more on this later.
Its a tight fit, but the H55F does fit. The other thing to watch for is the rear tailshaft does get pretty short, this means if you have really big lift the angles on the CVs can be pretty extreme and cause issues. As we were sticking with a 2 suspension lift this was ok.
Its now time to refit the body . (You can see that weve stripped and repainted the firewall/floor with killrust paint)
Fitted up new brake and clutch master cylinders
Next stage was test fit the guards and ensure there is enough clearance. We are also fitting up after market A/C, so had to make sure there was enough clearance around the compressor.

 Powertrain Control
 Last Online: 26-05-2025 @ 12:18 AM

Looks like you are doing great work there Errol but why do you want to fix up so many of these?
Fair Contributor to the Forums
Last Online: 26-06-2024 @ 11:46 AM
Now for the power steering conversion
A normal FJ40 has a manual steering box mounted right up near the firewall, it has a linkage arm to a pivot point near the front which has a second linkage arm connecting to the steering arm. As you can see from the pic, its a complicated and crappy steering system. As it has 6 tierod ends and so many moving parts, steering is very sloppy with very little feel, especially when the tierod ends start to wear

So the solution is to use a combination of a power steering box from a FJ60, new Pitman arms, drag links etc from 60 and 75 series cruisers. It also requires removing the factory strut towers and replacing them with a Ford F250 strut tower.
(F250 struts towers are next to the pump)
Now traditionally power steering is powered by a mechanical hydraulic pump attached to the engine, however we decided to try something different and go for an electric power steering pump from a Holden Astra. Note: This is still a hydraulic traditional system, except it uses an electric rather than mechanical pump. This is different to electric steering like in the VF.
There are a couple of reasons we went down this path Firstly we didnt have space to mount a normal power steering pump on the engine (unless we wanted to move and mount the alternator down low which isnt good for river crossings), secondly mechanical pumps tend not to provide much power when the engine is idling or at low speed (When doing a steep down hill descent the engine is only idling but you need maximum power) and they cause a lot of drag on the engine at higher rpm. An electric pump doesnt suffer from these issues, and also gives the benefit of having adjustable steering feel. The pump speed can be adjusted with a controller, meaning we can change how heavy/light the steering feels with a simple knob.
So the next stage was to come up with a mounting platform for the pump
Note: This was my first ever attempt at welding. I have wanted to learn how to weld so this was a great project to start with. I know some of the welds look pretty bad, but I got a friend to double check and he said the welds were strong (just ugly).
So by reusing the bolts from the pump install I was able to create a nice mounting system for the pump directly above the steering box. This meant a nice short power steering hose and minimum pressure loss.
Now one of the things I was concerned with was temperature of the power steering fluid and pump. Obviously we were going to run the pump pretty hard in some extreme climates, so I wanted the biggest cooler I could fit. This is the result
Yes, those are computer fans and yes I know their not water proof, but they were only $25 for the set, the move a decent amount of air and are mounted high enough that water shouldnt be an issue.
Overall I am pretty happy with the performance of the system, the only issue so far is seems to take around 5-10 seconds to come up to full pressure. So when you very first turn the system on you dont have power steering, however once running it is very good.
Fair Contributor to the Forums
Last Online: 26-06-2024 @ 11:46 AM
Haha thanks, yeah good question. Essentially we started with one (I'm sure this is a common story) which was a heap of fun off road but had its problems (wiring, interior etc), so we decided rather than fixing it up (which meant it would have been off the road for a long period) we would purchase a second one to do a rebuild. That way we had one to use on the weekends, and one to rebuild. Once the second was completely rebuilt, we could use that every weekend and take the original one and do a rebuild, meaning we would have had 2 rebuilt FJ40s (One each for dad and I), then we could go off roading together.Originally Posted by whitels1ss

Simple right?
Well it started to get complicated... One of the advantages of the first FJ40 was it was roadworthy and had an engineering certificate. As we wanted to upgrade the suspension, gearbox, engine, interior, wiring etc we were basically stripping a perfectly good FJ40 back to bare chassis and starting over. As we were changing engines the original engineering cert would become void. So rather than rebuilding an already pretty good FJ, we decided to buy 2 new ones to restore and keep the first FJ40 as is. Once we finished rebuilding the other 2, we would sell the first.
That was the plan...
We had purchased 3 FJs, we knew what needed to be done so it should have been straight forward.
When searching for parts on ebay we happened to spot the green FJ at a really good price ($3000) so we chucked in a bid and won it for $3100.
Now when we got it home we were really surprised how good condition the body/chassis was in. It seemed a shame to strip it back and paint it, so we decided to swap the first FJ40 body across (as documented above).
Where things got out of hand was the thought process was "Well if we are going this far, we may as well do xx". So suddenly it turned into a massive project where we are rebuilding/restoring 3 of the damn things (Including power steering, 4 wheel disk brakes, aircon etc etc).

Fair Contributor to the Forums
Last Online: 26-06-2024 @ 11:46 AM
Rear End...
As i mentioned earlier in the thread, when converting from a 4 speed to 5 speed gearbox, you need to come up with a handbrake arrangement on the rear. Typically most people convert to a FJ60 drum brake with handbrake rear end. the problem is they are a bit expensive to source and are still pretty crappy.
There are companies selling disk brake rear ends including a handbrake, but they are expensive (Think $1000+ landed here). Instead we decided to make up our own brakets and use a caliper from a Subaru Leone (1986). Couple of reasons for this.. Firstly, it will (mostly) fit over a landcruiser rotor. Secondly, they are pretty cheap and easy to source here. Finally (and most importantly), the handbrake is actually part of the caliper. It still uses a cable to actuate, but instead of using the inside of the rotor like a normal car it uses the actual disk pad.
We had to make up a bracket from 10mm steel plate, which trust me takes a lot longer than you'd expect. Theres just a lot of stuffing around to get everything lined up/working properly. To fit the front FJ40 disk to the rear also requires machining out the centre of the disk rotor and machining down some material on the hub. However this is the end result...
As you can see they nicely mount up to the diff housing, and when the cable is installed (not shown in those pics) will give a solid rear handbrake. I have tested this since installing and they are unbelievably brilliant.
Driveline - Although i dont have any pictures, we were lucky enough to find that 2 of the other FJ40s have mechanical aussie lockers fitted. As we had already purchased some new lockers from the US for the other 2 cars, we were able to install these lockers on this FJ40-1. So now it has dual front/rear mechanical lockers installed. Normally its not a great idea to install a mechanical locker in the front (as it effects steering when driving on bitumen), because the FJ40 uses a part-time 4WD system we can disconnect the front diff and hubs when driving on road. So effectively getting the best of both worlds...
We also rebuilt the front/rear diffs, rebuilt all 4 calipers, rebuilt both axles, all 4 hubs etc etc. So essentially the ENTIRE driveline has been completely rebuilt (Engine and gearbox had already been rebuilt less than 10,000km ago).
Fair Contributor to the Forums
Last Online: 26-06-2024 @ 11:46 AM
Couple of pics of the interior. Essentially it was stripped back to bare metal, then painted with killrust. The heater has been refurbished, the twin stick shifters have been installed, the centre trans tunnel plate has been modified to suit the new seat frame (more on that shortly) and the steering column rebuilt.
I have also installed a custom handbrake (From an Alfa Romeo, looked at literally ~2200 cars across 3 wreckers before I found one with the right dimensions). This took soooo much time and effort to get it exactly right. I needed enough clearance from the new seat frame, the twin sticks when in the 4WD/Low position and have enough room under the floor to create a mounting platform. I estimate I spent around 150-160 hours on the rear brake and handbrake setup.
Continuing on with my love-affair with dynamat, the interior has been coated with the new black dynamat. Primarily this was done to protect the paint underneath and stop chips and scratching from causing rust. It also offers slight noise and temperature reduction, but in a 1970s convertible thats kinda pointless.
Seating - So one of the biggest problems with the FJ40 is it was built for Japanese people in the 1960-1970 Eg, Short people. Its a bit hard to see in the pic below, but because of the fuel tank location and size the seat ends up being very close to the pedals and very high up. Being 63, I have to slouch down in the seat to be able to see out the window, even then I have to look through the blue tint at the very top.
So I made the decision (with my new welding skills) to build a new seat frame so I can have seats further down and further back. This would require a custom fuel tank to be made (which is currently being built by a specialist so it can have an engineering cert).
After many many many hours of measuring and building, this is the completed seat frame.
You can see how close it is to the handbrake .
This design allows a fuel tank of ~1100mm long, 110mm high and 400mm wide to fit inside (~48L capacity).
The best part of doing a custom seat frame is I was able to choose from any seat I could find. Again this meant hours walking around various wreckers to find the perfect seat. The result? A Volvo seat.
Now before you laugh, its from a Volvo 850R which was a $85k car in 1995 (Thats $140k in todays money).
There were a couple of reasons I choose this seat. Firstly, the matching pair was in good condition, they were very well priced ($130 for the pair), but more importantly they are 8 way electric WITH memory function AND they are heated.
As you can see below, they look pretty damn good in the car. (The leather looks worse in the pics than in real life, plus with a little bit of colour dye they look brand new).
The memory function is pretty sweet, as there will be 3 of us regularly driving and swapping during trips it is handy. The heated part is great being a convertible.
Again its a bit hard to tell, but compared to the original seats they offer SOOOO much more room. I can easily fit (In fact i move the seat a little forward and a little higher from is maximum back/low position). I reckon anyone up to 6'5" should be able to drive without an issue. (To get an idea of placement, look at the 4WD/High/Low shifter position)
The original wiring was pretty much useless, so we decided to start from scratch. Having built a complete custom wiring solution for the VX, we knew how to draw up schematics and had experience creating looms.
Rather than using Toyota parts, we instead sourced an engine bay wiring panel from a WK statesman. This gives us lots of flexibility and (Hopefully) reliability.
We fixed up the rear end and added some LEDs. I have mixed opinions on these, they look a lot better than the standard faded taillights but may not suit the style?? (Mudflaps will be fixed, the convertible roof braket will be repainted).
We upgraded the headlights with some really bright bulbs, work amazingly well. We still want to fit a LED bar, but this is good for normal driving.
Low Beam
High Beam
Id say they are as good (if not better) than my VX/VY commodore or even dad WM Statesman).
Fair Contributor to the Forums
Last Online: 26-06-2024 @ 11:46 AM
Now this is where we are up to (as of last weekend). The interior dash isnt finished (hence i havnt posted any pics yet), but we did get it driveable enough to take it for a test drive). There are still some rough edges and the rear section needs work, but its starting to look pretty good.

 One of the Top Contributors to the Forum
Last Online: 02-08-2018 @ 01:19 PM
One of the Top Contributors to the Forum
Last Online: 02-08-2018 @ 01:19 PM
Seat frame is a touch overbuilt but not a bad thing if you're going to offroad it
Considerable Contributor to the Forum
 Last Online: 01-12-2024 @ 08:54 PM
Or sitting on top of a fuel tank ......
Fair Contributor to the Forums
Last Online: 26-06-2024 @ 11:46 AM
Haha yeah, my dad made the same comment. I was using rods for welding, so was actually a bit easier working with the thicker steel.
Its actually good as it strengthens up the body and roll bar mounting area a bit.
I am actually quite proud of the design though, much better than pretty much every other FJ40 seat setup I've seen. The functionality was most important, so it achieved the requirements.
Its amazing how much time and effort it takes to get everything designed, can only imagine how much time you've spent Ian on your various projects. Its just the little things you need to take into consideration and so much testing...
Still, kinda nice when its all done.
 Forum Contributor
Last Online: 20-10-2021 @ 11:14 PM
Forum Contributor
Last Online: 20-10-2021 @ 11:14 PM
Very nice indeed. Top stuff.
Fair Contributor to the Forums
Last Online: 26-06-2024 @ 11:46 AM
Cheers,
Oh and bonus points for whoever recognizes the colour?
One of the Top Contributors to the Forum
Last Online: 02-08-2018 @ 01:19 PM
Yep for every hour working there's probably 3 spent thinking about how to make it happen the way I want
Very fulfilling once done though
Fair Contributor to the Forums
Last Online: 26-06-2024 @ 11:46 AM
Didn't get much done over the weekend, was at the airshow on Saturday and took the VX out for a drive on Sunday (first time in a couple of months).
Anyway got the new fuel tank (Picked it up in Geelong on Saturday when at the airshow), guy did a pretty good job. There are a number of internal baffles and the welding looks pretty good. Cost $600 all up including materials, not a bad effort considering the complex design...
I lined the seat frame with insulating rubber, the tank sits very well jammed inside. Even without the top straps the tank just doesn't want to move. Overall very happy with the design and outcome.
Also fitted up a new alloy radiator... Was a cheap Chinese one ($159) so im not expecting miracles but seems to work a lot better than the old one. Took a bit of modifying to get it in properly, but the welds etc look pretty good. Just not sure i can justify $1000+ on a PWR one at this stage...

This is a seriously impressive build mate, hats off to you for such incredible work.
I'm doing a FZJ80R LS3 conversion at the moment and I'm getting close to it being done, but boy is it a lot of hours. You're doing a heap of fabrication work as well.
Let me know if you ever decide to sell the FJ40.
There are currently 2 users browsing this thread. (0 members and 2 guests)
 Posting Permissions


 2006 HOLDEN SPECIAL VEHICLES MALOO